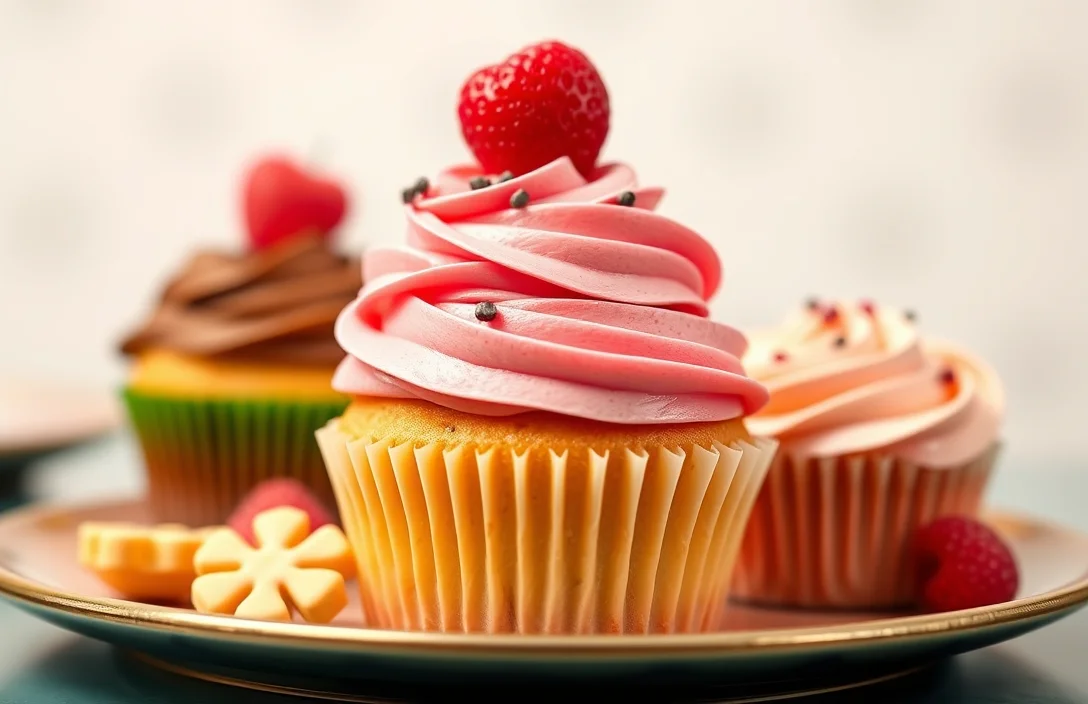
Trendy Preppy Cupcake Recipes: Stylish Treats with Decor Tips
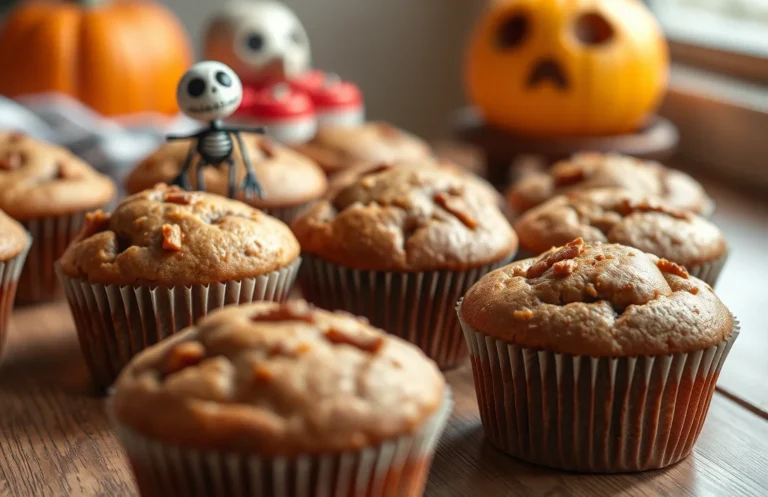
Welcome to the world of preppy cupcakes, where style meets scrumptiousness! These delightful treats are perfect for any occasion, whether you’re celebrating with friends or indulging in a cozy night at home. Each cupcake bursts with flavor and charm, making them a guaranteed crowd-pleaser that will have everyone asking for seconds!
Get ready to whip up five fabulous cupcake recipes that are easy to follow and visually stunning. Total time: 1 hour, Difficulty level: Easy, Servings: 12 cupcakes.
| Prep Time | Cook Time | Total Time | Servings | Difficulty |
|---|---|---|---|---|
| 20 minutes | 20 minutes | 1 hour | 12 | Easy |
Preppy Cupcake Origins
The concept of preppy-themed baking combines classic style with a touch of playful elegance, reflecting a lifestyle that values tradition and sophistication. Understanding the origins of preppy cupcakes can enhance your baking experience and inspire creativity in your kitchen.
Historical Context
- Influence of Ivy League fashion: The preppy aesthetic draws heavily from the Ivy League style, characterized by smart, tailored clothing and a polished image. This style emerged in the early 20th century, and its influence extended into culinary trends, including the art of baking.
- Connection to tradition: Preppy baking often emphasizes classic recipes, such as vanilla and chocolate cupcakes, with refined presentations that reflect the values of quality and craftsmanship. These traditions are celebrated and passed down through generations, making baking a cherished family activity.
What Makes It Preppy
- Color palettes: Preppy cupcakes often feature pastel colors like mint green, soft pink, and light blue, evoking a fresh and cheerful atmosphere. These colors can be achieved through natural food dyes or sprinkles, enhancing the visual appeal.
- Classic decorations: Think of clean lines with simple, elegant designs. Often, preppy cupcakes are adorned with clean fondant decorations or delicate buttercream swirls, echoing the minimalist yet stylish aesthetic that preppy culture embodies.
Occasions for Serving
- Bridal showers and weddings: Preppy cupcakes are a popular choice for elegant gatherings, providing a chic alternative to traditional wedding cakes. Their bite-sized nature allows guests to indulge without the commitment of a full slice.
- Garden parties: The light, airy design of preppy cupcakes makes them perfect for outdoor events. Serve them alongside refreshing lemonade or iced tea to complement the cheerful setting.
Ingredients for Preppy Cupcakes
This section provides a detailed list of ingredients needed to create the perfect preppy cupcakes. Having precise measurements and specifications ensures that your cupcakes turn out beautifully every time, embodying that stylish aesthetic you’re aiming for.
| Item | Amount/Specification | Notes |
|---|---|---|
| All-purpose flour | 1 ½ cups (180g) | Sifted for a lighter texture |
| 1 cup (200g) | Provides sweetness and moisture | |
| Baking powder | 1 ½ teaspoons | Ensure freshness for proper rising |
| Salt | ½ teaspoon | Enhances flavor |
| Unsalted butter | ½ cup (113g) | Softened to room temperature |
| Eggs | 2 large | Bring to room temperature for better mixing |
| Vanilla extract | 2 teaspoons | For a classic flavor |
| Milk | ½ cup (120ml) | Whole milk recommended for richness |
- For gluten-free cupcakes, substitute all-purpose flour with a gluten-free blend.
- If you are lactose intolerant, use a dairy-free butter alternative and almond milk.
- Make sure your butter is at room temperature to avoid lumps in the batter.
Essential Kitchen Tools
Gathering the right kitchen tools is essential for creating beautiful preppy cupcakes that not only taste amazing but also look delightful. Here’s a list of must-have equipment and some prep instructions to ensure your baking experience is smooth and enjoyable.
- Baking Pan: Use a standard 12-cup muffin pan specifically designed for cupcakes. This will ensure even baking. You may also want to have a mini cupcake pan for smaller treats.
- Cupcake Liners: Choose stylish paper or silicone liners that match your preppy aesthetic. These not only prevent sticking but also add a touch of flair to your cupcakes.
- Mixing Bowls: Have at least two medium mixing bowls. A glass or stainless steel bowl is ideal for mixing your batter and frosting, as they are easy to clean and won’t stain.
- Electric Mixer: A stand mixer is perfect for making fluffy batter and smooth frosting. If you don’t have one, a hand mixer will work just fine. Beat the mixture on medium speed until light and airy.
- Measuring Cups and Spoons: Accurate measurements are critical for baking success. Use dry measuring cups for flour and sugar, and liquid measuring cups for milk and oil.
- Spatula: A silicone spatula is perfect for folding ingredients and scraping down the sides of your mixing bowl. This ensures all ingredients are well incorporated.
- Cooling Rack: After baking, transfer cupcakes to a wire cooling rack. This allows air to circulate around them, preventing sogginess and ensuring they cool evenly.
Chef’s tip: Prepare your cupcake liners by lightly spraying them with non-stick spray for easy removal after baking.
Step-by-Step Baking Process
Understanding the baking process is crucial for achieving those stylish and trendy cupcakes that fit the preppy aesthetic. From mixing the batter to cooling and frosting, each step plays a vital role in the final outcome of your cupcakes. Follow these detailed instructions for a delightful baking experience!
- Mixing the Batter: Begin by preheating your oven to 350°F (175°C). In a large bowl, whisk together 1 ½ cups (190g) all-purpose flour, 1 cup (200g) granulated sugar, 1 ½ teaspoons baking powder, and ½ teaspoon salt until thoroughly combined. In a separate bowl, mix ½ cup (120ml) whole milk, ½ cup (120ml) vegetable oil, 2 large eggs, and 1 teaspoon vanilla extract until smooth. Pour the wet ingredients into the dry ingredients and whisk gently until just combined; be careful not to overmix to ensure a tender crumb.
- Baking Time: Line a muffin tin with cupcake liners and fill each liner about ⅔ full with the batter. Bake in the preheated oven for 18-20 minutes, or until a toothpick inserted in the center comes out clean. The tops should be lightly golden and spring back when touched. Keep an eye on them to avoid overbaking, which can lead to dry cupcakes.
- Cooling and Frosting: Once baked, remove the cupcakes from the oven and allow them to cool in the pan for about 5 minutes. Then, transfer them to a wire rack to cool completely, which should take another 15-20 minutes. For frosting, use your favorite buttercream or cream cheese frosting; a classic vanilla or pastel-colored frosting enhances the preppy look. Frost the cupcakes once they are completely cool to prevent the frosting from melting.
Chef’s tip: Always allow cupcakes to cool completely before frosting to maintain the best texture!
Pro Tips for Perfect Cupcakes
To achieve the perfect texture and aesthetic for your preppy kitchen cupcakes, it’s essential to follow some expert tips and avoid common pitfalls. Here’s how to ensure your cupcakes turn out as delightful as they look.
Achieving Right Texture
- Use Room Temperature Ingredients: Ingredients like eggs and butter should be at room temperature (around 68°F or 20°C) for better emulsification. This helps create a light and fluffy texture.
- Check Your Baking Powder: Ensure your baking powder is fresh. An old batch can lead to dense cupcakes. Test it by adding a teaspoon to hot water; it should fizz vigorously.
Avoiding Overmixing
- Mix Just Until Combined: Overmixing the batter can lead to tough cupcakes. Stir gently until you no longer see dry flour. The batter should be slightly lumpy, which is perfectly fine.
- Use a Rubber Spatula for Folding: When incorporating dry ingredients into wet, use a rubber spatula to fold gently. This preserves the air you’ve whipped into the batter, ensuring a light, airy cupcake.
Frosting Techniques
- Use a Piping Bag for Precision: For a polished look, fill a piping bag with frosting and use a star tip to create beautiful swirls. Aim for a height of about 1 inch for that stylish, preppy aesthetic.
- Chill Your Frosting: If your frosting is too soft, chill it for 15-20 minutes. This helps it hold shape when piped onto your cupcakes. If it becomes too firm, let it sit at room temperature for a few minutes before using.
Cupcake Variations and Modifications
When baking cupcakes, it’s essential to accommodate various dietary needs while maintaining that preppy aesthetic. This section provides gluten-free and vegan substitutes, along with exciting flavor variations to keep your cupcakes stylish and delicious.
Gluten-Free Options
For a gluten-free cupcake, substitute traditional flour with a gluten-free blend. Here’s a quick-reference table for ingredient modifications:
| Ingredient | Substitution |
|---|---|
| 1 cup all-purpose flour (120g) | 1 cup gluten-free all-purpose flour blend (120g) |
| 1 teaspoon baking powder | 1 teaspoon gluten-free baking powder |
Ensure that all other ingredients, like baking powder and vanilla extract, are gluten-free. The batter should feel slightly thicker than regular batter but should still pour easily. Bake at 350°F (175°C) for 18-20 minutes, until a toothpick inserted comes out clean.
Vegan Substitutes
To create a vegan cupcake, replace eggs and dairy with plant-based options:
- 1 large egg → ¼ cup unsweetened applesauce
- ½ cup milk → ½ cup almond milk (or any non-dairy milk)
- ½ cup butter → ½ cup coconut oil, melted
The batter should be smooth and slightly runny. Bake at the same temperature, 350°F (175°C), for about 20-22 minutes. Watch for a golden top and a firm spring back when lightly pressed.
Flavor Variations
Experiment with different flavors to keep things fresh and exciting:
- For chocolate cupcakes, replace ¼ cup of flour with cocoa powder.
- Add 1 teaspoon of almond extract for a nutty twist.
- Mix in lemon zest or orange zest for a citrusy note.
Chef’s tip: Always taste your batter before baking to adjust sweetness and flavor intensity!
Serving and Pairing Ideas
When it comes to serving your preppy kitchen cupcakes, presentation and pairing play vital roles in enhancing the overall experience. You want your cupcakes to not only taste fabulous but also look appealing and fit seamlessly into themed events or casual gatherings.
Plating Tips
- Use pastel-colored plates or vintage-inspired cupcake stands to accentuate the preppy aesthetic.
- Garnish your cupcakes with fresh fruit slices or edible flowers to add a pop of color and freshness.
- Consider creating a cupcake tower for a stunning centerpiece at your gathering.
Beverage Pairings
Choosing the right drinks can elevate your cupcake experience. Here are some delightful pairings:
- Classic Lemonade: The tartness balances the sweetness of most cupcakes.
- Sweet Iced Tea: A refreshing complement to buttery flavors.
- Prosecco: Bubbly and light, perfect for celebrations.
Themed Events
Consider these ideas for serving cupcakes at themed events:
For a bridal shower, opt for delicate floral designs and serve alongside champagne. For a summer picnic, use vibrant colors and serve with refreshing fruit-infused water.
| Event Type | Suggested Cupcake Flavor | Pairing Drink |
|---|---|---|
| Birthday Party | Funfetti | Root Beer Float |
| Bridal Shower | Lavender Vanilla | Cucumber Mint Sparkler |
| Baby Shower | Strawberry Cream | Peach Iced Tea |
Quick Recipe Summary
This section provides a concise overview of the essential elements of the Preppy Kitch Cupcake recipe. Understanding the key ingredients, baking time, and serving size will help you prepare these delightful treats with confidence and precision.
Key Ingredients
- 1 ½ cups all-purpose flour (190g)
- 1 cup granulated sugar (200g)
- ½ cup unsalted butter, softened (115g)
- 2 large eggs
- 1 cup whole milk (240ml)
- 2 teaspoons baking powder
- 1 teaspoon vanilla extract
- ¼ teaspoon salt
Baking Time
Preheat your oven to 350°F (175°C). Bake the cupcakes for 18-20 minutes, or until a toothpick inserted into the center comes out clean. They should be lightly golden on top and spring back when gently pressed.
Serving Size
This recipe yields 12 standard-sized cupcakes, perfect for gatherings or a sweet treat at home. You can easily double the recipe if you’re hosting a larger event.
“Chef’s tip: For a fun twist, try adding a teaspoon of lemon zest to the batter for a refreshing flavor!”
| Ingredient | Amount |
|---|---|
| All-purpose flour | 1 ½ cups (190g) |
| Sugar | 1 cup (200g) |
| Butter | ½ cup (115g) |
| Eggs | 2 large |
| Whole milk | 1 cup (240ml) |
Quick Summary
| Prep Time | 20 minutes |
|---|---|
| Cook Time | 18-20 minutes |
| Total Time | 40 minutes |
| Servings | 12 cupcakes |
- Preheat oven to 350°F (175°C) for even baking.
- Mix dry ingredients separately before adding to wet for a smoother batter.
- Fill cupcake liners 2/3 full to prevent overflow.
- Check doneness with a toothpick; it should come out clean.
- Cool completely before frosting to avoid melting.
- Tip: Use room temperature ingredients for better mixing.
- Tip: Don’t overmix; it can lead to dense cupcakes.
- Tip: Experiment with different frostings to elevate flavors.
Frequently Asked Questions
Can I make this ahead of time? How to store and reheat?
You can make the cupcake preppy kitch batter ahead of time and store it in the fridge for up to 24 hours. Just let it come to room temperature before baking, and bake at 350°F (175°C) for the usual time.
What can I substitute for the key ingredient?
If you’re out of buttermilk, you can substitute it with a mixture of 1 cup of milk and 1 tablespoon of lemon juice, letting it sit for 5 minutes to curdle. This will give you the same acidity and moisture that buttermilk provides.
How do I know when it’s done?
Your cupcakes are done when they are golden brown and a toothpick inserted in the center comes out clean or with just a few moist crumbs. They should also spring back when lightly pressed on top.
Can I freeze this? How long does it last?
Yes, you can freeze the baked cupcakes for up to 3 months. Just make sure to wrap them tightly in plastic wrap and place them in an airtight container to prevent freezer burn.
What if I don’t have a stand mixer?
You can use a hand mixer or even mix by hand with a whisk, just be sure to mix until all ingredients are well combined and the batter is smooth. It might take a little longer, but you’ll get the same delicious result!

- 10 Best Cheese Knife With Holes For Smooth Slice 2026 - March 9, 2026
- Make Cheesecake Up to 3 Days Ahead: Tips for Best Flavor & Texture - March 4, 2026
- Easy No-Bake Cool Doen Cheesecake: Quick Recipe & Tips - March 4, 2026