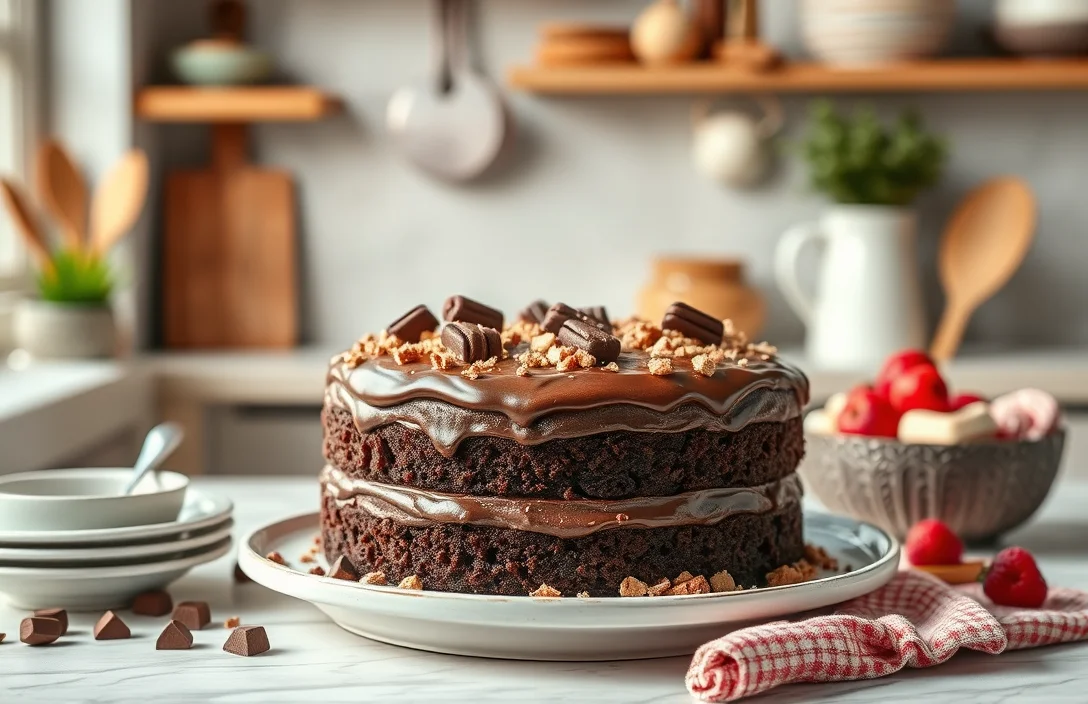
Decadent Chocolate Cake Recipe: Tips for Perfect Layers
There’s something about a decadent chocolate cake that feels like a warm hug. Whether it’s a birthday celebration, an indulgent weeknight treat, or just because you crave something sweet, this cake is sure to be a crowd-pleaser. Rich, moist, and oh-so-chocolatey, it’s the ultimate comfort food that never disappoints.
This recipe is designed for home cooks seeking a reliable, tested chocolate cake that’s easy to follow. With a total time of 1 hour, medium difficulty, and serves 8-10, you’ll have a stunning dessert ready in no time!
| Prep Time | Cook Time | Total Time | Servings | Difficulty |
|---|---|---|---|---|
| 20 minutes | 40 minutes | 1 hour | 8-10 | Medium |
Chocolate Cake History
Understanding the history of chocolate cake enriches the experience of baking and enjoying this beloved dessert. It reveals how this sweet treat evolved from simple origins to a cherished classic in celebrations and everyday life.
- Origins of Chocolate Cake: The first chocolate cake recipes emerged in the early 19th century when cocoa powder became widely available. Before that, chocolate was primarily consumed as a beverage. The combination of flour, sugar, eggs, and cocoa powder created a moist, rich cake that quickly gained popularity.
- What Makes It Special: Chocolate cake is celebrated for its decadent flavor and versatility. It can be made in various styles, from a simple one-layer cake to elaborate multi-tiered masterpieces. Its deep, rich taste and soft texture make it a favorite for birthdays, weddings, and other special occasions.
- When to Serve Chocolate Cake: While chocolate cake is often associated with celebrations, it can be enjoyed anytime. Whether served at a dinner party, as a comforting dessert after a meal, or even as an afternoon treat with coffee, chocolate cake fits any occasion. Its ability to pair well with ice cream, whipped cream, or fresh berries only enhances its appeal.
Ingredients for Chocolate Cake
This section provides a comprehensive list of ingredients needed to create a delicious chocolate cake, along with precise measurements and notes on substitutions. Using the right ingredients ensures your cake turns out moist, rich, and full of flavor, just like the ones from Preppy Kitchen.
| Item | Amount/Specification | Notes |
|---|---|---|
| All-purpose flour | 1 ¾ cups (220g) | For structure, do not pack down. |
| Cocoa powder | ¾ cup (75g) | Use unsweetened for best results. |
| Baking soda | 1 ½ teaspoons | For leavening. |
| Baking powder | 1 ½ teaspoons | For additional rise. |
| Salt | ½ teaspoon | Enhances flavor. |
| Sugar | 2 cups (400g) | Granulated for sweetness. |
| Eggs | 2 large | Room temperature for best mixing. |
| Whole milk | 1 cup (240ml) | Can substitute with almond milk for dairy-free. |
| Vegetable oil | ½ cup (120ml) | Keeps the cake moist. |
| Vanilla extract | 2 teaspoons | Adds depth of flavor. |
- For a richer taste, consider using dark chocolate cocoa powder.
- Make sure to sift the cocoa powder and flour to remove any lumps.
- If you have allergies, you can replace eggs with ¼ cup unsweetened applesauce per egg.
Essential Kitchen Tools
Having the right kitchen tools is key to successfully baking a chocolate cake. From mixing bowls to cake pans, each piece of equipment plays a crucial role in ensuring your cake turns out perfectly moist and delicious.
- Mixing Bowls: Use at least two mixing bowls – a large one for the wet ingredients and a medium one for the dry. Glass or stainless steel works best as they are durable and allow you to see the mixing progress.
- Measuring Cups and Spoons: Accurate measurements are vital for baking success. Have a set of dry measuring cups for flour and cocoa powder, and liquid measuring cups for milk and oil. Don’t forget measuring spoons for smaller amounts.
- Whisk and Spatula: A sturdy whisk is great for aerating the batter and ensuring everything is mixed thoroughly. A silicone spatula will help you scrape down the sides of the bowl and fold ingredients without deflating the mixture.
- Cake Pans: Use two 9-inch round cake pans for a layered cake. Make sure they are non-stick or grease them with butter and dust with flour to prevent sticking. If you don’t have round pans, you can use a 9×13-inch pan instead.
- Oven Thermometer: An oven thermometer ensures your oven is at the correct temperature, as many ovens can be inaccurate. Preheat to 350°F (175°C) for this recipe, and check the temperature before placing your cake inside.
- Cooling Rack: A cooling rack is essential for allowing your cake to cool evenly. It helps prevent sogginess by allowing air to circulate around the cake.
- Electric Mixer: While you can mix by hand, an electric mixer saves time and helps achieve a lighter batter. Use a paddle attachment for best results when mixing butter and sugar.
Step-by-Step Baking Instructions
This section will guide you through the essential steps to bake your chocolate cake perfectly. Following these instructions closely will ensure a moist, decadent cake that impresses everyone at the table.
- Preheat the Oven: Begin by preheating your oven to 350°F (175°C). This will ensure that your cake bakes evenly. Allow the oven to fully heat before placing the cake inside; this typically takes about 10-15 minutes.
- Prepare the Cake Pans: While the oven is preheating, grease and flour two 9-inch round cake pans. Use about 1 tablespoon of unsalted butter for greasing, then dust each pan with a light coating of all-purpose flour, shaking off any excess. This step is crucial to prevent sticking.
- Mix the Dry Ingredients: In a large mixing bowl, sift together 1 ¾ cups (220g) of all-purpose flour, 1 ¾ cups (350g) of granulated sugar, ¾ cup (65g) of unsweetened cocoa powder, 1 ½ teaspoons of baking powder, 1 ½ teaspoons of baking soda, and 1 teaspoon of salt. Sifting helps aerate the dry ingredients, resulting in a lighter cake.
- Combine Wet Ingredients: In a separate bowl, whisk together 2 large eggs, 1 cup (240ml) of whole milk, ½ cup (120ml) of vegetable oil, and 2 teaspoons of vanilla extract. This mixture should be smooth and well combined, with a pleasant aroma from the vanilla.
- Combine and Mix: Gradually pour the wet ingredients into the dry ingredients while mixing on low speed with a hand mixer or stand mixer. Mix until just combined, about 1-2 minutes. The batter should be thick and glossy, with no lumps.
- Bake the Cake: Divide the batter evenly between the prepared pans. Place them in the preheated oven, making sure they are spaced evenly apart. Bake for 30-35 minutes, or until a toothpick inserted in the center comes out clean. The cakes should spring back when lightly pressed.
- Cool the Cakes: Once baked, remove the pans from the oven and let them cool for about 10 minutes. Then, carefully run a knife around the edges and invert the cakes onto a cooling rack. Allow them to cool completely before frosting.
Chef’s tip: If using a dark or non-stick pan, reduce the baking time by a few minutes to prevent overbaking.
Expert Baking Tips
Perfecting a chocolate cake can be a delightful experience, but avoiding common pitfalls is essential for achieving that rich, moist texture we all crave. Here, I’ll share valuable tips on what to watch out for, how to store your cake, and some frosting advice to elevate your dessert game.
Common Mistakes
- Using cold ingredients: Always bring your eggs and butter to room temperature before mixing. Cold ingredients can result in a lumpy batter that doesn’t blend well, impacting the cake’s rise and texture.
- Overmixing the batter: Mix just until combined. Overmixing can develop gluten in the flour, leading to a dense cake instead of a light, airy one.
- Not measuring ingredients accurately: Use a kitchen scale for precise measurements, especially for flour. Too much flour can dry out your cake. A good rule of thumb is to spoon flour into your measuring cup and level it off with a knife.
Storage Tips
- Cool completely: Allow your cake to cool in the pan for about 10-15 minutes, then transfer it to a wire rack to cool completely. This prevents sogginess.
- Wrap for freshness: Store your cooled cake in an airtight container at room temperature for up to 3 days. If you have leftovers, consider wrapping slices individually in plastic wrap for easy access.
Frosting Tips
- Use the right temperature: Ensure your butter for frosting is soft but not melted. Creaming cold butter can result in a lumpy frosting that won’t spread smoothly.
- Layer your frosting: For a professional finish, apply a thin layer of frosting to seal in crumbs before adding a thicker layer. This “crumb coat” will give you a clean look.
Chocolate Cake Variations
Exploring variations of the classic chocolate cake allows you to cater to different dietary needs and flavor preferences. Whether you’re looking for gluten-free options, vegan adaptations, or simply want to mix up the flavors, these variations will ensure everyone can enjoy a slice of this delicious dessert.
Gluten-Free Options
If you need a gluten-free chocolate cake, substitute the all-purpose flour with a gluten-free flour blend. Here’s a quick reference for the adjustments:
- 1 ¾ cups gluten-free all-purpose flour blend (210g)
- 1 teaspoon xanthan gum (omit if your blend already contains it)
Follow the same mixing and baking instructions. The cake should rise nicely and have a soft, moist texture. Check for doneness by inserting a toothpick into the center; it should come out clean or with a few moist crumbs.
Vegan Adaptations
To make a vegan chocolate cake, you can replace the eggs and dairy with plant-based alternatives:
- 1 cup unsweetened applesauce (240g) instead of eggs
- ½ cup almond milk (120ml) instead of whole milk
- ½ cup vegetable oil (120ml) instead of melted butter
Mix the ingredients as you would for the traditional cake. The batter should be smooth and slightly thick. Bake at 350°F (175°C) for about 30-35 minutes. The cake will have a moist crumb and rich chocolate flavor.
Flavor Variations
Feel free to add different flavors to make your chocolate cake unique:
- 1 teaspoon espresso powder for a richer chocolate flavor
- 1 teaspoon peppermint extract for a minty twist
- 1 cup chocolate chips (170g) for extra chocolatey goodness
Chef’s tip: Always taste your batter before baking; adjust sweetness or flavor as needed!
These variations not only cater to dietary restrictions but also enhance your cake experience, making it versatile and enjoyable for everyone.
Serving Ideas and Pairings
Presenting your chocolate cake beautifully can elevate your dessert experience. Here are some creative plating tips, beverage pairings, and serving suggestions to make your cake shine at any gathering.
Plating Tips
- Use a cake stand to showcase your masterpiece; it adds height and elegance.
- Dust the top with powdered sugar or cocoa powder for a refined finish.
- Garnish with fresh berries like raspberries or strawberries for a pop of color and tartness.
- Drizzle a warm chocolate ganache over each slice just before for a decadent touch.
Beverage Pairings
| Beverage | Description |
|---|---|
| Red Wine | A rich Cabernet Sauvignon or Merlot complements the chocolate perfectly. |
| Coffee | A strong espresso or a creamy latte enhances the flavors of the cake. |
| Milk | Classic and comforting; an icy cold glass of milk balances the sweetness. |
| Tea | A robust black tea, like Earl Grey, offers a delightful contrast. |
Serving Suggestions
For a touch of sophistication, serve your chocolate cake warm with a scoop of vanilla bean ice cream. The creaminess of the ice cream will meld beautifully with the rich chocolate. Alternatively, if you want to cut through the richness, serve slices with a dollop of freshly whipped cream mixed with a hint of vanilla extract.
Chef’s tip: Serve your cake at room temperature for the best texture and flavor. If it’s been refrigerated, let it sit out for at least 30 minutes before serving.
Quick Recipe Summary
This section highlights the essential components of the Preppy Kitchen’s chocolate cake recipe, including a glance at the ingredients and a brief overview of the key steps involved in making this delicious treat. Whether you’re a seasoned baker or a novice, having this concise summary can help streamline your baking process.
Ingredients at a Glance
- 1 ¾ cups all-purpose flour (220g)
- 2 cups granulated sugar (400g)
- ¾ cup unsweetened cocoa powder (65g)
- 1 ½ teaspoons baking powder
- 1 ½ teaspoons baking soda
- 1 teaspoon salt
- 2 large eggs
- 1 cup whole milk (240ml)
- ½ cup vegetable oil (120ml)
- 2 teaspoons vanilla extract
- 1 cup boiling water (240ml)
Key Steps Overview
- Preheat the oven: Set your oven to 350°F (175°C) and prepare your cake pans by greasing them with butter and dusting with flour.
- Mix dry ingredients: In a large mixing bowl, whisk together flour, sugar, cocoa powder, baking powder, baking soda, and salt until well combined.
- Add wet ingredients: Incorporate eggs, milk, oil, and vanilla into the dry mixture, mixing until smooth. The batter should be thick and glossy.
- Stir in boiling water: Carefully whisk in the boiling water; the batter will become thin. This step ensures a moist cake.
- Bake: Divide the batter evenly between your prepared pans and bake for 30-35 minutes, or until a toothpick inserted in the center comes out clean.
- Cool: Allow the cakes to cool in the pans for 10 minutes before transferring them to a wire rack to cool completely.
Chef’s tip: Always check that your baking powder and soda are fresh for the best rise!
Quick Summary
| Prep Time | Cook Time | Total Time | Servings |
|---|---|---|---|
| 20 minutes | 30 minutes | 50 minutes | 8 servings |
- Preheat oven to 350°F (175°C) before mixing ingredients.
- Mix dry ingredients separately to ensure even distribution.
- Beat eggs and sugar until pale for a fluffy texture.
- Alternate adding wet and dry ingredients to maintain consistency.
- Bake for 30 minutes or until a toothpick comes out clean.
- Cool completely before frosting for best results.
- Tip 1: Use room temperature ingredients for better mixing.
- Tip 2: Don’t overmix; stop as soon as ingredients are combined.
- Tip 3: Use high-quality cocoa powder for rich flavor.
Frequently Asked Questions
Can I make this ahead of time? How to store and reheat?
You can make this chocolate cake up to 2 days ahead of serving. Store it in an airtight container at room temperature, and if you need to reheat, pop slices in the microwave for about 10-15 seconds.
What can I substitute for eggs in this recipe?
You can substitute each egg with 1/4 cup unsweetened applesauce or 1/4 cup plain yogurt for a moist cake without eggs.
How do I know when it’s done?
Your cake is done when a toothpick inserted in the center comes out clean or with a few moist crumbs, which usually takes about 30-35 minutes at 350°F (175°C).
Can I freeze this? How long does it last?
Yes, you can freeze the chocolate cake for up to 3 months. Wrap it tightly in plastic wrap and then in aluminum foil to prevent freezer burn.
What if I don’t have a round cake pan?
If you don’t have a round cake pan, you can use a 9×13-inch baking dish instead; just adjust the baking time to about 25-30 minutes for even baking.

- 10 Best Cheese Knife With Holes For Smooth Slice 2026 - March 9, 2026
- Make Cheesecake Up to 3 Days Ahead: Tips for Best Flavor & Texture - March 4, 2026
- Easy No-Bake Cool Doen Cheesecake: Quick Recipe & Tips - March 4, 2026