Cheesecake Baking Times: Tips for Perfect Results Every Time
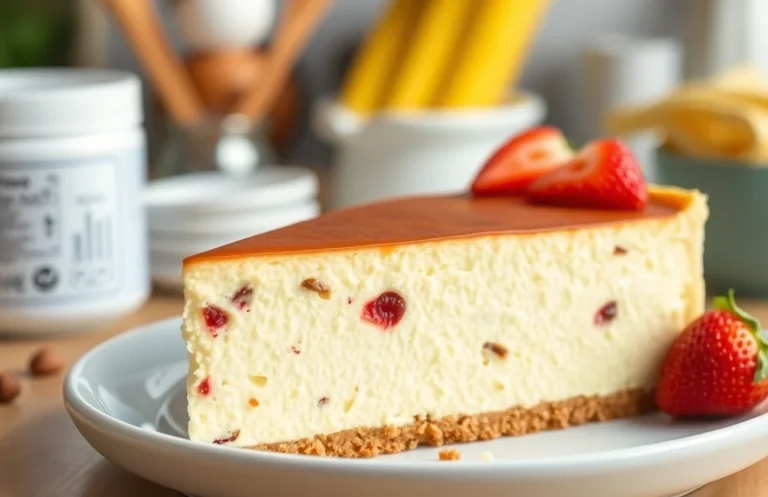
Cheesecake cake is the perfect dessert that marries the creamy richness of cheesecake with the delightful fluffiness of cake, creating an irresistible treat that’s always a hit at gatherings. Whether it’s a birthday celebration or a cozy weeknight dinner, this decadent dessert will have everyone coming back for seconds!
Get ready to bake your new favorite dessert with this easy-to-follow guide on cheesecake cook times! You’ll find recipes with precise cooking times, temperatures, and serving suggestions, ensuring perfect results every time.
| Prep Time | Cook Time | Total Time | Servings | Difficulty |
|---|---|---|---|---|
| 20 minutes | 60 minutes | 4 hours | 8 servings | Medium |
History of Cheesecake
Cheesecake has a rich history that spans centuries and continents, making it a beloved dessert in various cultures. Understanding its origins not only enhances our appreciation for this creamy delight but also informs how we approach its preparation, including the crucial aspect of cook time.
Cultural Significance
Cheesecake’s roots can be traced back to ancient Greece, where it was served to athletes at the first Olympic Games in 776 B.C. Here are some key points about its evolution:
- In ancient Rome, cheesecake was modified with different ingredients and became popular among the upper classes.
- The modern cheesecake we know today took shape in the 18th century when cream cheese was introduced in the United States.
- Regional variations, such as the New York-style cheesecake, emphasize a dense and creamy texture, often requiring precise baking times for the perfect outcome.
When to Serve Cheesecake
Cheesecake is a versatile dessert that can be enjoyed on various occasions. Here are some popular times to serve it:
- Holidays and celebrations: Birthdays, weddings, and Thanksgiving dinners.
- Casual gatherings: Perfect for family get-togethers or potlucks.
- Special treats: Ideal for when you’re in the mood for something indulgent.
Chef’s tip: Always let your cheesecake cool completely before slicing to maintain its structure and achieve a clean cut.
Understanding the history and cultural significance of cheesecake helps us appreciate its preparation and the precision needed in cooking times. A well-baked cheesecake not only delights the taste buds but also pays homage to its storied past.
Ingredients for Cheesecake
This section lists all the essential ingredients you’ll need to create a delicious cheesecake. Having the correct measurements and specifications is crucial for achieving the perfect texture and flavor. Let’s gather what we need!
| Item | Amount/Specification | Notes |
|---|---|---|
| Cream Cheese | 24 ounces (680g) | Softened to room temperature for easy mixing |
| Sugar | 1 cup (200g) | Granulated sugar works best |
| Eggs | 3 large | At room temperature for better incorporation |
| Vanilla Extract | 2 teaspoons | Pure vanilla extract for enhanced flavor |
| All-Purpose Flour | 2 tablespoons (15g) | Helps stabilize the cheesecake |
| Crust Ingredients | ||
| Graham Cracker Crumbs | 1 ½ cups (150g) | Use finely crushed for a smooth crust |
| Butter | ½ cup (115g) | Melted, adds richness to the crust |
| Brown Sugar | ¼ cup (50g) | Optional, for added depth of flavor |
- Ensure the cream cheese is fully softened; this prevents lumps in your batter.
- Room temperature eggs mix more easily, leading to a smoother filling.
- If you’re gluten-free, you can substitute the graham crackers with gluten-free options.
- Preheat your oven to 325°F (163°C) before mixing ingredients for optimal baking.
- Watch the crust closely while baking; it should be lightly golden, not burnt.
Essential Kitchen Tools
Having the right kitchen tools is crucial for achieving the perfect cheesecake cake with the right cook time. This section outlines the essential equipment you’ll need for mixing, baking, and cooling your cheesecake cake, ensuring a successful baking experience.
- Mixing Tools: You will need a sturdy mixing bowl and a hand mixer or stand mixer. A hand mixer is ideal for smaller batches, while a stand mixer offers convenience for larger quantities. Make sure your mixing bowl is at least 4 quarts to accommodate all the ingredients without spilling.
- Baking Pan: A 9-inch springform pan is recommended for cheesecake cakes. The springform design allows you to easily release the cake without damaging its delicate structure. Lightly grease the pan with butter or cooking spray and line the bottom with parchment paper for easy removal.
- Cooling Rack: After baking, transferring your cheesecake cake to a cooling rack is essential. This helps prevent condensation from forming on the bottom of the cake, which can make it soggy. Allow the cake to cool in the pan for about 10-15 minutes before removing the sides of the springform pan and placing it on the cooling rack.
Chef’s tip: Always allow your cheesecake cake to cool completely before refrigerating, as this helps it set properly and enhances the flavor.
Step-by-Step Cooking Instructions
In this section, we’ll cover the essential steps to prepare the crust, mix the filling, and bake your cheesecake cake perfectly. Each step includes precise timings and tips to ensure your cheesecake turns out creamy and delicious.
- Prepare the Crust: Preheat your oven to 350°F (175°C). In a medium bowl, combine 1 ½ cups (150g) of graham cracker crumbs, ¼ cup (50g) of granulated sugar, and ½ cup (115g) of melted unsalted butter. Mix until well combined and the mixture resembles wet sand. Press the crust evenly into the bottom of a 9-inch (23cm) springform pan. Bake for 10 minutes, until slightly golden and fragrant. Allow to cool while preparing the filling.
- Mix the Filling: In a large mixing bowl, beat 24 oz (680g) of softened cream cheese with an electric mixer on medium speed until smooth and creamy, about 2-3 minutes. Gradually add 1 cup (200g) of granulated sugar and beat until fully incorporated. Add 3 large eggs, one at a time, mixing on low until just combined. Finally, fold in 1 teaspoon of vanilla extract and ½ cup (120ml) of sour cream until smooth. The filling should be thick and creamy with a slight sheen.
- Baking Process: Pour the filling onto the cooled crust and smooth the top with a spatula. Bake in the preheated oven for 50-60 minutes, or until the edges are set and the center still has a slight jiggle. Do not open the oven door during the first 30 minutes to prevent cracking. Once done, turn off the oven and crack the door, letting the cheesecake cool in the oven for 1 hour. This gradual cooling helps prevent cracks and maintains a silky texture.
Expert Tips for Perfection
Mastering the cook time for your cheesecake cake is essential to achieving that perfect texture and flavor. Here are some seasoned tips to help you check for doneness and prevent any dreaded cracks in your cheesecake.
Checking Doneness
- Use the jiggle test: When your cheesecake cake is nearing the end of its baking time, gently shake the pan. If the center jiggles slightly but the edges are set, it’s done. This indicates a creamy texture without overcooking.
- Temperature check: Invest in an instant-read thermometer; the internal temperature should reach about 150°F (65°C) when done. This ensures that your cake is not only cooked but also safe to eat while maintaining its silky smoothness.
- Visual cues: The top of the cheesecake should be lightly golden and not puffed up. If you see cracks forming, don’t panic! They can often be covered up with toppings later.
Preventing Cracks
- Water bath method: Baking your cheesecake in a water bath helps regulate temperature and adds moisture, reducing the chance of cracks. Wrap your springform pan in aluminum foil to prevent water from seeping in, and place it in a larger pan filled with hot water.
- Room temperature ingredients: Ensure your cream cheese and eggs are at room temperature before mixing. This helps create a smoother batter and reduces the mixing time, which can develop air bubbles leading to cracks.
- Cool gradually: After baking, turn off the oven and let the cheesecake cool inside with the door slightly ajar for about an hour. This slow cooling process minimizes temperature shock, which can cause cracks.
Cheesecake Variations
This section highlights gluten-free and vegan alternatives for cheesecake, ensuring you can enjoy this delightful dessert regardless of dietary preferences. Understanding these variations is key for achieving the perfect bake while accommodating different needs.
Gluten-Free Options
Creating a gluten-free cheesecake is simple and just as delicious! Substitute traditional graham crackers with gluten-free options, such as almond flour or gluten-free cookie crumbs. Here’s how to adjust the crust:
- 1 ½ cups gluten-free cookie crumbs (150g)
- ½ cup unsalted butter, melted (115g)
- ¼ cup granulated sugar (50g)
Mix these ingredients and press them firmly into the bottom of your springform pan. Bake at 350°F (175°C) for 10 minutes. This helps to set the crust before adding the filling.
Vegan Alternatives
For a vegan cheesecake, you can use plant-based ingredients that mimic the creaminess of traditional cheesecake. Here’s a basic recipe for a vegan filling:
- 2 cups raw cashews, soaked for 4-6 hours (300g)
- ¾ cup coconut cream (180ml)
- ½ cup maple syrup (120ml)
- 2 tablespoons lemon juice (30ml)
Blend the soaked cashews, coconut cream, maple syrup, and lemon juice until smooth. Pour over your prepared crust and bake at 325°F (160°C) for 45-50 minutes. The filling should be set but slightly jiggly in the center when done.
Chef’s tip: Allow the cheesecake to cool completely in the pan before refrigerating for at least 4 hours, which helps it set properly.
| Ingredient | Traditional | Gluten-Free | Vegan |
|---|---|---|---|
| Crust | Graham Crackers | Gluten-Free Cookies | N/A |
| Filling | Cream Cheese | Cream Cheese Substitute | Cashews |
| Sugar | Granulated Sugar | Granulated Sugar | Maple Syrup |
Be sure to monitor the baking times closely, as gluten-free and vegan cheesecakes may require slight adjustments based on your oven’s characteristics.
Serving and Plating Suggestions
After you’ve perfected your cheesecake cake, serving and plating it beautifully can elevate the experience. Here are some garnishing ideas and beverage pairings to enhance your delightful dessert and make it even more appealing.
- Garnishing Ideas: Consider a topping of fresh berries such as strawberries, blueberries, or raspberries for a burst of color and flavor. A simple dusting of powdered sugar (about 1 tablespoon) over the top can add a touch of elegance. For an extra layer of flavor, drizzle a homemade fruit coulis or chocolate sauce on the plate, which can be made by simmering 1 cup of berries with 2 tablespoons of sugar until thickened.
- Serving Temperature: Serve your cheesecake cake chilled for the best texture. Aim for a serving temperature of about 50°F (10°C). After taking it out of the refrigerator, let it sit for about 10-15 minutes before slicing to allow it to soften slightly for easier cutting.
- Beverage Pairings: Pair your cheesecake cake with a glass of dessert wine, such as a late-harvest Riesling or a sweet Moscato, which complements the richness of the cake. Alternatively, coffee lovers may enjoy a fresh cup of brewed coffee or espresso, which balances the sweetness of the dessert beautifully.
- Presentation Tips: For an attractive presentation, slice the cheesecake into even wedges using a sharp knife dipped in hot water. Wipe the blade clean between cuts to maintain neat edges. Serve each slice on a dessert plate and consider adding a sprig of mint for a pop of color.
Quick Summary
| Prep Time | Cook Time | Total Time | Servings |
|---|---|---|---|
| 20 minutes | 45 minutes | 1 hour 5 minutes | 8 |
- Preheat oven to 325°F (163°C) before mixing ingredients.
- Prepare crust by combining crushed graham crackers, sugar, and melted butter.
- Beat cream cheese until smooth to avoid lumps in the batter.
- Bake for 45 minutes, then cool slowly in the oven to prevent cracks.
- Chill in the refrigerator for at least 4 hours before serving.
- Use room temperature cream cheese for a smoother texture.
- Check for doneness by gently shaking the pan; the center should slightly jiggle.
- Let cool with the oven door ajar to reduce cracking.
Frequently Asked Questions
Can I make this ahead of time? How to store and reheat?
You can absolutely make cheesecake cake ahead of time; it stays fresh in the refrigerator for up to 5 days. Just cover it tightly with plastic wrap or foil to prevent drying out, and reheat individual slices in the microwave for about 10-15 seconds before serving.
What can I substitute for cream cheese?
If you need a substitute for cream cheese, you can use mascarpone cheese or a mixture of Greek yogurt and sour cream in equal parts for a similar texture. Keep in mind that the flavor may vary slightly, so adjust your sweetness accordingly.
How do I know when it’s done?
Your cheesecake cake is done when the edges are set but the center has a slight jiggle; it will firm up as it cools. A good test is to check the internal temperature, which should be around 150°F (65°C).
Can I freeze this? How long does it last?
Yes, you can freeze cheesecake cake for up to 3 months if wrapped tightly in plastic wrap and then aluminum foil. Thaw it overnight in the refrigerator before serving for the best texture.
Why did my cheesecake cake crack on top?
Your cheesecake cake might crack due to baking at too high a temperature or if it was overmixed, causing air bubbles to form. To prevent this, bake it at a steady 325°F (163°C), and consider using a water bath for even cooking.

- Top 10 Best Professional Home Espresso Machine 2026 - July 29, 2026
- Top 10 Best Lever Espresso Machine 2026 - July 29, 2026
- Top 10 Best Espresso Machine Under 2000 2026 - July 29, 2026